You could say I’ve been on an Opéra kick lately. I made the above shortly after the completion of May’s Daring Baker’s challenge and I’m posting this just in case the food blogging world hasn’t seen enough Opéra cakes lately. After having tried a less traditional pistachio-apricot Opéra last time, I was curious to try the classic flavor combination of espresso syrup-soaked almond joconde, mocha buttercream, ganache and chocolate glaze and used the recipe from Dorie Greenspan’s Paris Sweets. These flavors did not disappoint. Actually, that’s an understatement. I made these for a party and people’s eyes bulged out after taking a bite.
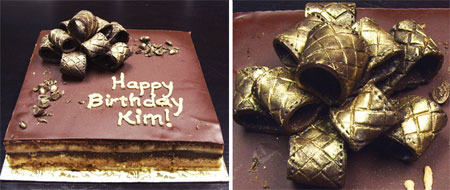
My next Opéra variation was for my boss’ 50th birthday. I made a Frangelico-espresso syrup soaked almond joconde, with peanut butter mousse, ganache, and chocolate glaze. My boss loves the designs of the luxury hand woven leather goods manufacturer Bottega Veneta, so I created a chocolate bow inspired by their classic woven patterns. The bow was made from chocolate modeling paste, onto which I imprinted the criss-cross design. I cut out strips, formed them into loops, and arranged the loops into a decorative bow. For the stitching detail, I used a decorative comb used to created ridges on the sides of cakes. The triangular teeth had the perfect spacing to create a repeated indented pattern that resembled stitching. The entire bow was dusted with gold dust.
I was sooo excited when I found out this month’s Daring Bakers challenge was an Opéra cake. I’ve enjoyed my share of similarly quadrilateral shaped layer cakes in Paris, always wondering how they were done (and mostly questioning how those sides were cut with such laser-like precision).
This month’s Opéra cake challenge was a marriage of recipes from Dorie Greenspan’s Paris Sweets and Tish Boyle and Timothy Moriarty’s Chocolate Passion. While the Opéra cake is typically made with joconde, dark chocolate ganache, and buttercream, the twist for this month’s challenge was to keep the colors and flavors light, i.e. no dark chocolate, coffee, etc. I decided the light theme would be well suited for Mother’s Day, so I ultimately decided upon a combination of almond joconde flavored with apricot-kirsch syrup, pistachio buttercream, apricot mousse, apricot glaze. This flavor combination was inspired by a class on petits gateaux that I took with Chef Chad Pagano at the ICE. I filled it with fresh apricot chunks, and the top is decorated with white chocolate swirls, chopped pistachios and specks of edible gold leaf.
For the buttercream recipe, I used an old standby which can be found on a previous post (with modified quantities). I mixed pistachio paste into the basic buttercream at the end and it was delicious. Sugar Chef made an amazing creation and was kind enough to post her recipe and photo on the Daring Baker’s non-public site and I basically used her mango mousse recipe to create my apricot mousse. For the glaze, I used agar agar dissolved in apricot juice. I also used syrup flavored with kirsch and apricot juice to moisten the cake. The white chocolate swirls were a bit tricky. Instead of just drizzling the chocolate over the top of the glaze, I drizzled it over silpat which I topped with chopped pistachios while the chocolate was still liquid. I then carefully transferred the fragile, hardened white chocolate web onto the top of the cake. I did this perhaps unnecessarily complicated maneuver so the pistachio bits would adhere only to the chocolate, not the glaze. Finally, I added a few small bits of edible gold leaf.
I’m thrilled these seemingly daunting cakes were finally demystified! Though there are some changes I would make to this cake next time, the process was actually much simpler than I would have guessed. And the getting the sides cut neatly wasn’t rocket science and didn’t require a laser. A freezer and a long knife dipped in hot water and cleaned, however, was extremely helpful.
Thanks to Lis, Ivonne, Fran, and Shea for hosting and choosing such an awesome challenge! If you’d like the basic recipe, I’m hoping and fairly certain you will find it on their sites. For an inspiring roundup of other Daring Bakers’ concoctions, click here.
I recently posted a black pearl cake with ginger, wasabi, black sesame seeds here. It was so delicious I made it again, this time in a miniature cupcake version. I’m talking *mini*, as in I baked them in wrappers generally used to hold chocolates (though the package did say they were baking cups). These were absolutely delicious, moist bitefuls of chocolate cake filled with ganache, complemented beautifully by airy whipped cream frosting.
In the cake version, found in my previous post or the original here, you bake three 8″ layers, soak each layer with ginger syrup, and fill the cake with black sesame seed/ginger/wasabi ganache between layers. In this cupcake version, I did brush syrup on the tops of each cupcake and piped the ganache right into the heart of these mini chocolate bites. I topped each cupcake with the ginger whipped cream, black sesame seeds and chopped crystallized ginger.
I also adjusted the baking time, of course, so they baked for about 10-12 minutes or so. Adjust the cooking time depending on the size of your liners, of course. If you’re making mini-mini cupcakes as I have, you may want to half the recipe, as these would make a LOT.
April’s Daring Bakers challenge was cheesecake lollipops dipped in chocolate. I had first seen and eaten these cheesecake pops at Davidburke and Donatella restaurant in New York (their pops come with bubble gum whipped cream) and thought the concept was really quite inventive and playful. In an episode of Road Tasted on FoodNetwork, it was revealed that David Burke’s children were the actual inspiration for these pops and now they’re a huge seller. A chef from the restaurant demonstrated how their pops are created. After baking the cheesecake, it is whipped, put into a pastry bag, piped onto a sheet, then dipped into chocolates, tuxedo style. In our challenge recipe, the cheesecake was baked, frozen, scooped into balls, then dipped in chocolate.
We were given free reign in our choice of toppings and in the shapes of the pops, so I eventually settled on five toppings: cocoa nibs, chopped dried cherries, crystallized ginger chips, crushed chocolate chip cookies, and crushed chocolate cookies. I think my pops turned out resembling meteoritic space balls, but I was not unhappy with the look.
At first, I dipped a single topping onto each pop, but I starting mixing it up a bit to accommodate eaters who might like to sample several of the toppings at once.
I also experimented with the shape a bit and used round cutter to create a drum-like shape with sides. This allowed me to alternate toppings a bit easier.
Thanks to Deborah from Taste and Tell and Elle from Feeding my Enthusiasms, who were this month’s hostesses. Deborah has the recipe posted on her site if you’re interested. The recipe calls for adding shortening in the chocolate to create a snap, but I used cocoa butter instead, which worked well. I also flavored my pops with seeds from a vanilla bean. To be frank, if I made these again, I would try another cheesecake recipe. I think at the very least, the cheesecake itself could have used a kick with more citrus flavors. I would also try the piping method to avoid the mess created from rolling the cheesecake balls by hand. To check out what other Daring Bakers have done for this challenge, click here.
It’s been a while since my last post, I know. I actually have been quite busy baking for a recent dessert party, so you’ll be seeing some non-cake posts for a while. First up is a classic fruit tart. Despite my recent propensities to tinker with recipes, there is little I would want to mess with when it comes to this dessert.
My sister likes to remind me of a sad little story about me and fruit tarts. In my first trip to Paris during my college days, I salivated over these glistening tarts in the patisserie windows. Though I was backpacking throughout Europe and my budget was limited, I had passed by too many shops before I finally purchased one, which was carefully packaged in a cardboard box. I placed it in my bag to savor that evening. I had been wandering by myself that day and had gotten lost trying to meet up with my sister that evening, so it was a pretty miserable day for me. All I looked forward to was my precious tart. Well, as you’ve probably guess my now, by the time I opened the box, the perfect tart form was completely destroyed, its custard innards scrambled with fruit and broken shells. It was pretty sad. I learned a lesson that day about how the ephemerality and fragility of beauty.
I’ve made apple tarts before using the recipe here, but I’ve never actually attempted a fruit tart with tart dough and pastry cream. Despite my overbaking the tart shell, it was so simple, I wondered why on earth I haven’t made this before. The tart was extremely well-received.
Fresh Fruit Tart
Pastry Cream (recipe based on one from a class by chef Chad Pagano) 2 cups milk 1/3 cup sugar 2 egg yolks 1 whole egg 3 tblsp cornstarch 1/3 cup sugar 1/4 stick (2 tblsp) butter
In a saucepan, dissolve first portion of sugar in milk, bringing to boil. Whisk egg and yolks in a bowl. Sift cornstarch and second portion of sugar into eggs and beat until smooth. Slowly pour hot milk into eggs in a steady stream (to avoid cooking eggs). Transfer mixture back to saucepan and reheat until boiling. Stir constantly. When mixture comes to a boil – it will be thick – remove from heat. Stir in butter and mix until melted. Transfer to a clean bowl and chill for at least three hours. I added a tablespoon of Cointreau to my pastry cream after the butter. Pastry cream can be flavored with other liqueurs, vanilla bean, chocolate, etc.
Sweet Tart Dough (from Desserts by Pierre Herme, by Doree Greenspan) This recipe makes enough for three batches of tart dough. This larger quantity is recommended because it is easier to prepare a larger batch at once. It can be frozen for later use.
2.5 sticks unsalted butter, softened 1/2 cup lightly packed ground blanched almonds 1 1/2 cups confectioners sugar, sifted 1/2 tsp salt 1/4 tsp vanilla extract 2 large eggs, room temperature, lightly beaten 3.5 cups all purpose flour
Beat butter on low speed in the bowl of a mixer with paddle attachment. Add rest of ingredients, except flour, and blend on low speed, scraping down sides occasionally. Add flour in 3-4 additions, still on low speed, just until mixture comes together. Divide dough into three discs (for 10″ tart pans) and wrap each in plastic. Chill/rest in refrigerator for at least 4 hours or freeze up to a month.
Roll out dough a floured surface until it is large enough to come up the sides of the tart pan (about 1/8″ thick). To prevent sticking, keep rotating the dough. Trim edges by rolling the pin across the top edges of the pan, patching any holes as necessary. Chill dough in pan for 30 minutes.
Preheat oven to 350 degrees. Blind bake tart dough. Place parchment paper or foil onto dough and fill with dry beans or rice for 18-20 minutes. Remove paper and beans/rice and bake 5 more minutes or until golden. Transfer to wire rack and cool.
To assemble tart, spread pastry cream over shell. Arrange sliced fruits in decorative manner. Glaze with apricot jam, that has been heated and thinned with a little water. Strain jam and brush over fruits.
My first Daring Bakers challenge is coincidentally, similar to the first layer cake I ever posted on my blog. Since I was already familiar with the techniques for making the cake and buttercream, I puzzled over how I would re-create this challenge. I ultimately decided to make a cake that celebrated Spring and Easter: a luscious lemon layer cake with passion fruit buttercream and apricot jam. The top is decorated with a spun sugar nest and chocolate mini-eggs dusted with iridescent luster dusts.
I’ve been enamored with passion fruit for a while. This tart, intensively flavored tropical fruit found in South America, Southeast Asia and Australia is not the most accessible or economical fruit. I found purees available on Amazon and L’epicerie, and also found the actual fruit available at my local Garden of Eden store for $2 for one piece. Consequently, I was delighted when my husband came home one day with passion fruit pulp he found in the freezer section of our local supermarket, at about $2 for the Goya brand. I haven’t actually tried many passion fruit purees or pulps for comparison, but I think the Goya brand flavored the buttercream just fine. As an added bonus, the passion fruit pulp tinted the buttercream a lovely and natural yellow color, the very color I had envisioned for my cake, which also hints to the lemon flavored cake within.
At the risk of belaboring my passion for passion fruit, waxing philosophical over cake, and perhaps drawing too many connections, the thought occurred to me after the fact that this fruit was appropriate for Easter for another reason. While researching how “passion fruit” got its name, I discovered that it was attributed to early European explorers who thought the flower of the passion fruit resembled the crown of thorns in the passion of Christ.
Pictured above is the spun sugar nest I made. I actually received a second degree burn in the process – but fortunately, I am quite experienced at treating burns thanks to my glassblowing experience. I made this nest as I was treating my burn, so I suppose it came out sufficiently well under the circumstances. I piped buttercream vines and flowers, which I then painted over with edible luster dust dissolved in alcohol.
I thought I would earn some brownie points with my parents by bringing the cake to their church for Easter. I was concerned that the passion fruit/apricot/lemon combination would be too tart, but the cake was a huge hit and people responded very positively to the flavors. The Korean congregation felt the need to sing, as if celebrating a birthday, and somehow this cake got lost in translation as they sang in broken English:
Happy Easter to you Happy Easter to you Happy Easter, Jesus Christ Happy Easter to you!
Without further ado, here is the recipe (the original is from Dorie Greenspan’s Baking from My Home to Yours, but I am posting a version with the adjustments I made):
For the Cake 2¼ cups cake flour 1 tablespoon baking powder ½ teaspoon salt 1¼ cups buttermilk 4 large egg whites 1½ cups sugar 2 teaspoons grated lemon zest 1 stick (8 tablespoons or 4 ounces) unsalted butter, at room temperature ½ teaspoon pure lemon extract
For the Buttercream (this is 1.5x Doree’s buttercream recipe, to accommodate the extra needed for decorating) 1½ cup sugar 6 large egg whites 4½ sticks (18 ounces) unsalted butter, at room temperature ½cup passion fruit pulp (start with less and add to taste)
For Filling apricot jam
Optional Decorations spun sugar nest chocolate mini eggs, such as Cadbury’s or make your own truffle eggs luster dust
Getting Ready Centre a rack in the oven and preheat the oven to 350 degrees F. Butter two 9 x 2 inch round cake pans and line the bottom of each pan with a round of buttered parchment or wax paper. Put the pans on a baking sheet.
To Make the Cake Sift together the flour, baking powder and salt. Whisk together the milk and egg whites in a medium bowl. Put the sugar and lemon zest in a mixer bowl or another large bowl and rub them together with your fingers until the sugar is moist and fragrant. Add the butter and working with the paddle or whisk attachment, or with a hand mixer, beat at medium speed for a full 3 minutes, until the butter and sugar are very light. Beat in the extract, then add one third of the flour mixture, still beating on medium speed.
Beat in half of the milk-egg mixture, then beat in half of the remaining dry ingredients until incorporated. Add the rest of the milk and eggs beating until the batter is homogeneous, then add the last of the dry ingredients. Finally, give the batter a good 2 minute beating to ensure that it is thoroughly mixed and well aerated. Divide the batter between the two pans and smooth the tops with a rubber spatula. Bake for 30-35 minutes, or until the cakes are well risen and springy to the touch – a thin knife inserted into the centers should come out clean.
Transfer the cakes to cooling racks and cool for about 5 minutes, then run a knife around the sides of the cakes, unfold them and peel off the paper liners. Invert and cool to room temperature, right side up (the cooled cake layers can be wrapped airtight and stored at room temperature overnight or frozen for up to two months).
To Make the Buttercream Put the sugar and egg whites in a mixer bowl or another large heatproof bowl, fit the bowl over a plan of simmering water and whisk constantly, keeping the mixture over the heat, until it feels hot to the touch, about 3 minutes. The sugar should be dissolved, and the mixture will look like shiny marshmallow cream. Remove the bowl from the heat. Working with the whisk attachment or with a hand mixer, beat the meringue on medium speed until it is cool, about 5 minutes. Switch to the paddle attachment if you have one, and add the butter a stick at a time, beating until smooth. Once all the butter is in, beat in the buttercream on medium-high speed until it is thick and very smooth, 6-10 minutes. During this time the buttercream may curdle or separate – just keep beating and it will come together again. On medium speed, gradually beat in the passion fruit pulp, waiting until each addition is absorbed before adding more. You should have a shiny smooth, velvety buttercream. Press a piece of plastic against the surface of the buttercream and set aside briefly.
To Assemble the Cake Using a sharp serrated knife and a gentle sawing motion, slice each layer horizontally in half. Put one layer cut side up on a cardboard cake round or a cake plate protected by strips of wax or parchment paper. Spread with preserves. Cover the jam evenly with buttercream. Top with another layer, spread with preserves and buttercream and then do the same with a third layer. Place the last layer cut side down on top of the cake and frost the sides and top with buttercream. [Tip: I like to do a “crumb coat” before the final frosting, which seals the crumbs and prevents it from mixing into the frosting. Frost the entire cake with a very thin layer of buttercream and refrigerate for about 15 minutes. Then proceed to frost the cake with the rest of the buttercream.] Decorate as you wish.
Serving The cake is ready to serve as soon as it is assembled, but it’s best to let it sit and set for a couple of hours in a cool room – not the refrigerator. Whether you wait or slice and enjoy it immediately, the cake should be served at room temperature; it loses all its subtlety when it’s cold.
First Daring Baker’s challenge completed! Thanks to Morven for hosting this month’s event, and to Lis and Ivonne for founding the group. To see what fellow daring bakers have created for this month’s theme, click on the logo below.
I’m a big fan of Vosges Haut Chocolat’s exotically flavored chocolates, so I was dying to try this recipe for a cake modeled after their Black Pearl chocolate flavored with ginger, wasabi and black sesame seeds. The opportunity finally arose when I had to make a cake for my brother-in-law’s birthday. At first I was a bit wary of the chocolate bar’s translation into cake form, but this recipe ended up being a knockout. I think it was one of the most delicious cakes I’ve ever tried or made. If you’re a fan of ginger and Asian flavors, I would highly recommend it.
The flavor combination is sophisticated but cohesive. The chocolate cake layers with ginger bits are soaked with a vanilla bean/ginger syrup, which infuses moistness throughout; the ganache is flavored with ginger, wasabi and laced with black sesame seeds for a subtle crunch. The lightness of the ginger whipped cream frosting sprinkled with more black sesame seeds is a perfect compliment to the luscious cake.
The modifications I made to the recipe were using one 10″ springform pan instead of three 8″ pans. The cake rose right up to the edge, so I would not use a 9″ springform, or it will probably spill over. Using one springform increased the baking time to a total of about an hour. I also doubled the ginger powder and added extra wasabi, but the latter was still very subtle. I also stabilized the whipped cream with 3/4 tsp of powdered gelatin dissolved in 3 tsp water. This is not necessary – I just like the added insurance. For decoration, I added slivers of crystallized ginger.
Tip: If you are pressed for time for waiting for the ganache to set, place it in a pot over a ice-water bath, stirring the ganache. It should firm up in minutes. Black Pearl Layer Cake Please see recipe at epicurious.com
For February’s Daring Bakers challenge, I went with a flourless chocolate cake with cardamom/kaffir lime infused ice cream and banana passion fruit sauce, sprinked with cacao nibs. I’ll admit not crazy about my presentation, but I really loved the flavor combination of cardamom, kaffir lime and passion fruit/banana…yum…The kaffir lime leaves were given to me from my sister in law’s Thai aunt. I’ve got a stash in the freezer that I’ve been wanting to incorporate into desserts.
The February 2009 challenge is hosted by Wendy of WMPE’s blog and Dharm of Dad ~ Baker & Chef. We have chosen a Chocolate Valentino cake by Chef Wan; a Vanilla Ice Cream recipe from Dharm and a Vanilla Ice Cream recipe from Wendy as the challenge.
Chocolate Valentino Preparation Time: 20 minutes 16 ounces (1 pound) (454 grams) of semisweet chocolate, roughly chopped ½ cup (1 stick) plus 2 tablespoons (146 grams total) of unsalted butter 5 large eggs separated
1. Put chocolate and butter in a heatproof bowl and set over a pan of simmering water (the bottom of the bowl should not touch the water) and melt, stirring often. 2. While your chocolate butter mixture is cooling. Butter your pan and line with a parchment circle then butter the parchment. 3. Separate the egg yolks from the egg whites and put into two medium/large bowls. 4. Whip the egg whites in a medium/large grease free bowl until stiff peaks are formed (do not over-whip or the cake will be dry). 5. With the same beater beat the egg yolks together. 6. Add the egg yolks to the cooled chocolate. 7. Fold in 1/3 of the egg whites into the chocolate mixture and follow with remaining 2/3rds. Fold until no white remains without deflating the batter. {link of folding demonstration} 8. Pour batter into prepared pan, the batter should fill the pan 3/4 of the way full, and bake at 375F/190C 9. Bake for 25 minutes until an instant read thermometer reads 140F/60C. Note – If you do not have an instant read thermometer, the top of the cake will look similar to a brownie and a cake tester will appear wet. 10. Cool cake on a rack for 10 minutes then unmold.
I also had a gluten-free friend who was hosting a party, and since I had already cut out hearts for the challenge cake, I decided to try another flourless cake recipe. I thought the challenge cake came out a bit dense, but it was quite possibly due to my over-baking. At any rate, I tried the recipe for Williams Sonoma’s Flourless Chocolate torte. This one calls for rum, sugar and more eggs and while simply presented, I thought this one was more successful. And the booze couldn’t hurt.
I’ve been wanting to create a vegan black forest cake for a while, so a recent family gathering presented itself as the perfect opportunity to experiment with one. Also, I came across this oddly named product “Soyatoo” at the local health food store, which aroused both my curiosity and suspicion. It’s a vegan whippable soy topping which comes in either the boxed version pictured below or a spray cream.
There were several components to this cake that were new to me, and that I ended up struggling with. Aside from the fact that I’m still new to the vegan desserts thing, I’ve only used agar agar once before and I was scratching my head over what to do with soyatoo. But I had a vision of a cake with an ethereal miroir glaze, and it was to have the components of a black forest cake, with French-style aesthetics, and it was to going to be vegan.
I used a cake recipe from Fran Costigan’s non-dairy desserts class at ICE (seems I’ve gotten quite a bit of mileage out of this class). It turned out delicious and moist. I also used her recipe for a cherry cream made from silken firm tofu, reconstituted dried cherries and chopped chocolate as a basis for my cherry “mousse”. However, here’s where the soyatoo comes in – in order to stabilize it a bit more and create a more mousse-like texture, I added agar agar to a portion of the soyatoo, then added this to firmly whipped soyatoo. I then folded this whipped soyatoo into the cherry cream to create a mousse, which I refrigerated for a few hours. I lined the bottom of a cake ring with the cake (the same technique I used in my last post), spread a layer of cherry mousse over the cake, lined the sides with halved and pitted cherries at regular interval, and filled the ring with the remaining mousse. I let this set in the refrigerator while I went to experiment with my agar agar miroir.
A miroir or mirror is typically made with gelatin, but since I was making a vegan cake, I used agar agar dissolved in boiled cherry juice. I ended up having to create several few layers for adequate coverage, but I finally achieved the glass-like quality I was hoping for, which was thrilling!
I was really happy that the cake turned out okay, that my experiments were successful overall. Next time, I would modify the cake to mousse proportion, adding another layer of cake, perhaps. Also, I thought the soyatoo had a slight aftertaste, though my husband thought it was quite good. I googled the product to see what others thought and it seems some people swear by this stuff while others have a less pleasant reaction. It’s a personal, subjective taste, but I think it’s a reasonable substitute for whipping cream, which I’d use again if essential.
I entered this cake into my first baking contest at thekitchn.com’s bittersweet baking contest and was thrilled when it chosen by the editors as a finalist! Dorie Greenspan, James Beard award winning author of books on legends such as Julia Child, Daniel Boulud, Pierre Herme etc., was among the judges. As it that weren’t awe-inspiring in and of itself, I was ecstatic when I read her comments:
“I’ve never set out to make anything specifically vegan, but this recipe is so well done that I wanted to try it: it makes a convincing case as a delicious, multi-textured cake; the fact that it’s vegan might be a bonus, but it’s not the cake’s sole virtue. My guess is that the cake’s tri-part chocolate components and its polished looks will capture the imaginations of other ambitious bakers.”
Speaking of authors, pioneering pasty chef Fran Costigan, whose vegan baking class I took last year at ICE and whose cake recipe I used as a basis for this cake, also had this to say: “…thank you for taking what you learned and creating a masterpiece that reflects your creativity and skill”.
It’s admittedly a great leap in style from my previous cakes but I’ve been trying to take steps towards a healthier lifestyle, including exploring alternative cake recipes. I am not a vegan by any means, but I find vegan baking techniques appealing for their absence of cholesterol-laden ingredients such as butter, eggs and milk. I also wanted to make it aesthetically appealing, as I know many people might be wary of vegan baking. I shared the cake with coworkers/neighbors and they could not believe it was a vegan cake, even after tasting it!
The recipe is an experimental, culinary collage culled from various photos and recipes. The assembly process is vaguely that of a French style gateaux, the inspiration for its physical appearance and components comes from epicurious.com, the cake recipe is adapted from a class I took with Fran Costigan. The cake incorporates bittersweet chocolate on three levels and layers: cake, mousse filling, and ganache. It has a hint of coffee flavor, with espresso powder as an ingredient, and is laced with hazelnuts and orange zest. This is a rather involved cake, but can by all means be simplified. Either the mousse or the cake frosted with ganache can be eaten on its own.
Chocolate Mousse 2 12 ounce boxes silken firm tofu (such as Mori Nu) 10 oz finely chopped bittersweet chocolate 2 tablespoons agave (or maple syrup) 1 teaspoon vanilla extract
Chocolate Cake 1/2 cup whole wheat pastry flour 1/2 cup all purpose flour 1/3 cup unsweetened cocoa powder 1/4 cup sugar 1 teaspoon baking powder 1/2 teaspoon salt 1/4 cup canola oil 1/2 cup maple syrup, grade A, dark amber 1 cup soy milk 1 teaspoon espresso powder dissolved in 2 teaspoons of water 1 1/2 teaspoons pure vanilla extract 1 teaspoon apple cider vinegar 4 ounces finely chopped bittersweet chocolate 1 teaspoon orange zest 1/2 cup toasted hazelnuts, skins removed, chopped
Ganache Glaze 8 oz finely chopped bittersweet chocolate 1 cup soy creamer 2 teaspoons Grand Marnier
Prepare mousse: Melt chocolate 10 ounces of chocolate over double boiler. Drain water from tofu. Place tofu, agave/maple syrup and melted chocolate in food processor and mix until well combined and smooth. Refrigerate for at least 1 hour to firm. (This turned out to be very rich and dense. I think I would add some soy milk next time).
Prepare candied orange zest, if making your own: I did end up making my own, and it was well worth it in the end. The zest added a really lovely crunch and citrus element, not to mention a lovely color contrast to the dark chocolate. I adapted a recipe from here:
1/2 cup sugar 1/4 cup water peel of one orange
Using a vegetable peeler, peel strips from orange, avoiding the white pith. Julienne the orange peel into matchstick size pieces. Place zest in saucepan, pour water over it and bring to a boil. Drain and repeat. Yes, repeat – it’s supposed to reduce the bitterness. Remove from water and dry onto paper towel. Place sugar and 1/4 cup of water in a saucepan and let simmer for about 10 minutes (leave it alone – no need to stir at all). Add the strips and watch closely until strips are translucent (I probably left mine on the heat longer than I should have, but it still tasted great). Remove strips with a fork and cool onto parchment or waxed paper. While I didn’t have any left over, this can be stored in an airtight container for up to one week. Also, keep it stored in the container and decorate when ready to serve. If you leave the candied strips on the cake overnight, the sugar will absorb moisture and lose some of its brittle-like quality.
Prepare cake: Preheat oven to 350 degrees. Oil a 9×3″ cake pan and line with parchment paper. Toast hazelnuts for 8-10 minutes (watch carefully) and rub with kitchen towel to remove skin. Chop and set aside.
Sift dry ingredients into a bowl and stir with a whisk. Stir in chocolate, orange zest and hazelnuts. Mix wet ingredients and whisk until well combined. Pour wet into dry ingredients and mix until combined. Pour batter into prepared pan.
Bake for 20-25 minutes or until cake tester/toothpick inserted into the center comes out clean. Cool the pan on a wire rack for about 10 minutes. Invert the pan onto the wire rack, peel off parchment paper, invert again and let cool completely.
Prepare ganache: Bring soy creamer just until boiling. Pour over chopped chocolate and let sit for minute. Stir slowly until chocolate is melted.
Assemble cake: I used a bottomless 8×2 inch cake ring as a mold. I’m sure there are alternative ways of assembling this (such as using a springform pan), but this method is what I came up at the time. I cut out the cake to fit inside the ring, using the ring as a guide.
Then I filled it with mousse. Make sure you press mousse to the edges (which I didn’t do). I left a little room on top for the ganache. Pour ganache and move the cake around to allow it to flow to the sides in order to cover the surface of the top. Let the ganache set in the refrigerator. Once set, remove the cake from the ring (you should have a support under the cake, such as a cardboard circle).
Top with chocolate shavings, candied orange zest, and hazelnuts. Now you could stop here and end up with exposed sides of cake, mousse and ganache, but since I didn’t press the mousse all the way to the edges, and had some gaps where the cake and mousse met, I spread ganache on the sides, as well. I thought it needed something else, so I used some chocolate transfer sheets I had on hand to decorate the sides. A chocolate transfer sheet is a plastic sheet imprinted with a pattern made with cocoa butter (which I think is by-product of the cocoa bean and therefore still vegan [Fran Costigan did indeed confirm that transfer sheets were vegan – thanks!]). I melted chocolate and spread it over the sheet in a thin layer with an offset spatula. Before the chocolate fully set, I cut triangular shapes in the chocolate. Once set, I peeled the chocolate from the sheet and was left with triangular shards of chocolate imprinted with the cocoa design. I then arranged my chocolate triangles onto the sides of the cake and finally called it done!
I’ll be experimenting with this cake a bit (I’ve already received request to make this again for an upcoming event). It was indeed labor intensive but I had fun and learned quite a bit every step of the way. For more info on vegan baking, ppk has some essential info on substitutes for eggs, dairy, butter, etc. Fran Costigan’s More Great Good Dairy-Free Desserts Naturally and Moscowitz/Romero’s Vegan Cupcakes Take Over the World are also great resources on vegan baking, recipes and inspiration.